What Size Landscape Lighting Transformer to Use to Power Your Design?
As a professional landscape lighting designer looking to install and operate a new low voltage lighting system, you need to consider what transformer will be required to convert your standard line voltage outlets using 110-120V into your outdoor low voltage 12V-15V lighting design. This consideration as an outdoor lighting installer allows your landscape lights to function properly for many years ahead and will reduce issues with lights failing or ending up with weak outputs further down the line of wire connections around the property landscapes, keeping your clients happy and referring customers for many years ahead. So, to answer the question about How Many Landscape Lights Can I Connect to which Transformer Wattage, we must first look at some of the basic lighting design specs and considerations.
1) How many lights will I be installing?
2) What is the total Watts and Voltage Amp draw of the landscape lights being installed in an area?
3) What wire gauge size will I be using, 18/2, 16/2, 14/2, 12/2 or 10/2?
If you want the super duper shortcut to finding the minimum wire gauge or the minimum transformer you can get away with, or the maximum load or the maximum distance of a run… then grab your mobile device, open the app store and download Landscape Lighting Calculator. The app calculators take into consideration VA loss over length of wire by gauge, tap voltage and more. Learn more at https://landscapelightingcalculator.com/ . (note: Landscape Lighting Calculator is not a product of Garden Light LED.) Critical considerations before starting out: If you connect low voltage lights directly to line voltage power, the higher 120 voltage will cause them to burn out immediately. Therefore, a low voltage transformer power source must be used, which can then plug into your main power source to properly run your landscape lights each night. If you don’t have a GFI outlet available, seek a professional electrician to install one for your new low voltage lighting system prior to installation where the transformer is desired to be placed out of sight. If using the more powerful magnetic landscape lighting transformers, it’s always best to not go over 80% of its maximum wattage rating. Now, to figure out how many 12V lights you can power outside with a single low voltage transformer, look to the wattage and VA ratings for the fixtures being installed. Once that has been considered and calculated with the number of lights on the systems run, you can look for a low voltage transformer that has a higher minimum wattage rating.

How Many Landscape Lights Can You Install on a Low Voltage Transformer
Transformer power spec considerations: Calculating Voltage Amps as opposed to Watts, will show you the true power draw on your line, and this is why it is advisable to use this number to ensure you don’t purchase a landscape lighting transformer that isn’t adequate to power your lighting design installation, since it will only cause issues for you down the road eating into your profit and your customers happiness.
Small Landscape Lighting Design Plan Power Calculations
So, if you want to connect ten landscape spotlights to a small transformer, and the lights utilize 2W / 4VA / 20 watts halogen equivalent light output power each, you would want a 100-watt transformer. (Example of calculations: 10 lights X 4 VA = 40 voltage amps).
Large Landscape Lighting Design System Power Draw Formula
Again, if you want to connect twenty landscape lights to a low volt transformer, and the lights are pulling 4W / 7VA / 35 Watts of halogen power draw on the system, you would need a 300 watt transformer. (20 lights X 7 VA = 140 voltage Amps, so it’s best to use a 300 Watt) since 150W transformer will not give you enough buffer of the recommended 20-25% below maximum watts rating, for your new landscape lighting system to stay properly lit for many years ahead.

Wire Plays an Important Role in Your Lighting Design Considerations for Power
Additionally, when considering what wire gauge to use for your landscape lighting design installation, its best to understand that different gauges have their own pros and cons. Note: smaller wire sizes are often more economical and larger wire sizes are stronger, however the smaller ones will also reduce the distance of power being provided to your lights in the ground, and may require conduit to stay safe from dreaded landscaper cuts to your lighting connections. In this example of installing your landscape lights with specific wire gauges as another consideration for which transformer wattage to buy, we can benchmark some calculations knowing that typically, a 300-watt transformer can power 100 feet run using 16 gauge, or 150 feet using 14 gauge, or 200 feet when using the most popular 12 gauge cables. It’s always advisable to check with the lighting manufacturers territory managers and sales teams prior to purchase, to discuss any other factors and considerations to best determine the proper transformer and wire gauge to use for your specific landscape lighting design system.
It’s Always Best to Double Check Landscape Lights and Low Voltage Transformer Calculations
Since there are so many factors to consider to create a professional lighting design project, it’s always best to consult your experienced lighting design specialist, as they can advise you on the best type of wire (ie: standard copper, vs anti-corrosive wire) along with the proper transformer and landscape lighting models / finishes to buy for your specific applications. Since often, they have handled and managed a very similar installation using the design techniques desired in your area, to ensure your new installation stays working great years later, and worry free.
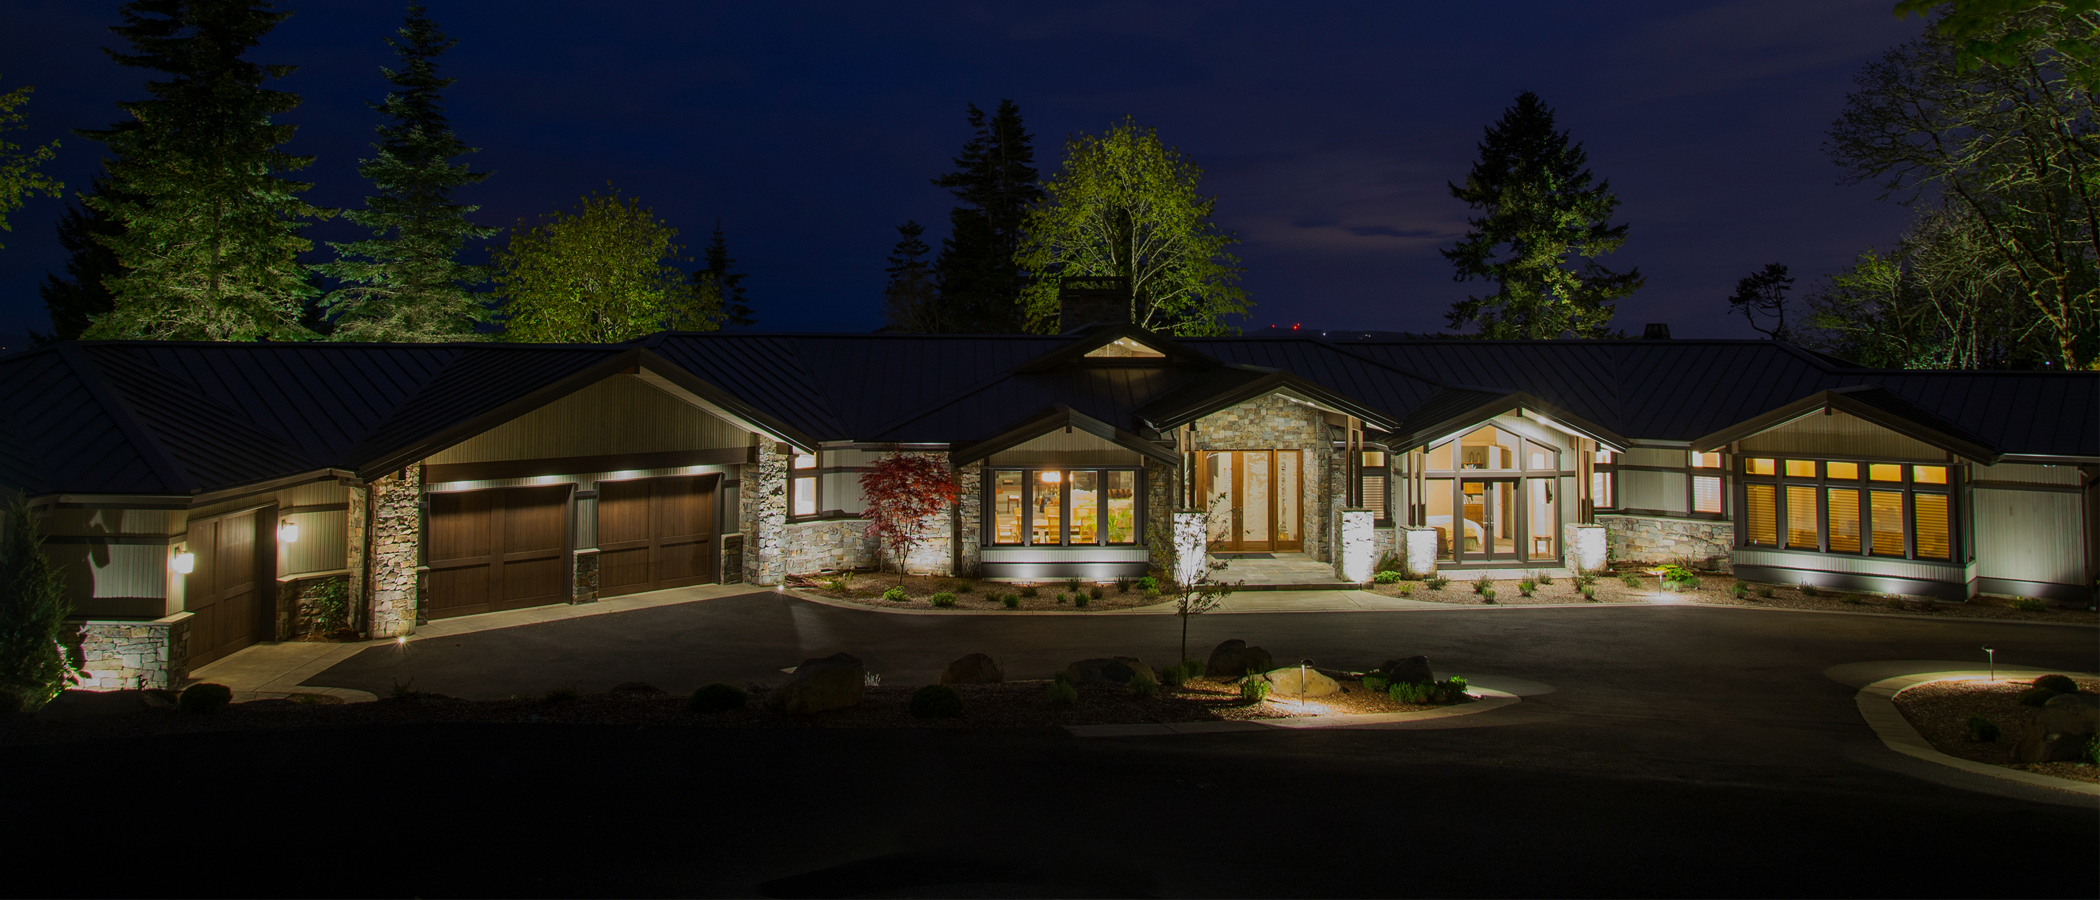
How to Photograph Your Architecture and Lighting Designs at Night
To capture amazing images of your lighting design applications, and create that perfect portfolio to showcase the beauty of your work, let’s consider a few basics for photographing the architecture and landscapes of your projects at night. When buildings are illuminated at night their shapes and features are enhanced in a very different way than by daylight and it’s a great time to take photographs. The most challenging task with nightscape photography is getting the exposure and color balance right, which we’ll help with below by considering a few tips to improve your lighting design gallery.
Nightscape Photography for Architecture and Landscapes
Buildings with outdoor lighting systems that offer a unique landscape layout or architectural design make for an especially appealing subject to photograph when lit up at night and will certainly help you add that wow factor to showcase your work. With that in mind and imagery being so critical for selling clients on your future projects as a landscape architect or lighting designer, here are some considerations to understand prior to just going to snap that quick shot with a phone instead of a camera with the proper lens for capturing the best nighttime photography to truly showcase the value of your lighting designs at their real estate during the late afternoon into the evenings at night.
1) Nightscape Considerations: When shooting a buildings architecture upwards at night you can expect the building to slope inwards at the top, giving that roof line is falling forward feeling to the viewer. With that building is falling down perspective feeling often becoming even more noticeable when a wide-angle lens is used to capture that entire scene and not one specific for architecture with a shift lens. To avoid this, move to a higher position to reduce the distortion perception or use a special shift lens that’s designed to correct that perspective. As noted, some of the more advanced lenses, may get pricey though for an average photographer who barely shoots their lighting designs very often, so plan to make time for this after every project to build out your portfolio and to win new jobs, or rely on a high quality photo editor and good software, to help you out with correcting that dreaded falling architecture perspective effect. Also, as you may try to include the whole building, by using a wider angle lens or stepping back to a more suitable viewpoint. Choose the position carefully! The same building could be shot head-on, or at an angle, and always try to get a photo from that same spot in both total darkness and with your lighting design fully illuminated.
2) The Exposure Matters: When the sun goes down the light changes in two ways; firstly the exposure time required increases and secondly the color of the light becomes warmer. Also in regards to the best exposure, consider that In typical lighting design applications there is low light levels and the shutter speed that’s necessary to ensure a good exposure will usually be too long to avoid a camera shake when hand holding the camera. Using a tripod enables you to shoot at these long exposure times of between 1/15sec and several seconds or even minutes. If you don’t have a tripod you can usually find a wall, lamppost or tree to support the camera, which can help considerably. Or you can try switching to a higher ISO as most cameras now cope well in the higher ranges. This means that in low light situations, such as shooting buildings at night, you can take photos with minimal noise or blurring. You’ll also want to put your camera’s self-timer into action or use a remote release if you have one as even pressing the shutter button can introduce shake that’ll leave your with blurry shots.
3) Metering the Light Levels: Low light can also fool the camera’s meter and this happens because it looks at the mass of dark and tries to compensate to make it mid grey. By doing so, you get an exposure time that is too long for all the illuminated parts of the scene, such as neon lights, street lights, path lights, wall washers or spot lit areas of a building and landscape as they become grossly over exposed and glaring. To avoid this, you need to compensate for it. As a guide, use your exposure compensation setting to reduce the exposure by a couple of stops when most of the area is in darkness and by one stop when the building has a medium coverage of illumination.
4) Proper Color Balance: illuminated building architecture when offset against a dark sky can look great, but you have to be careful with the color palette being photographed as there can be a slight orange or yellow cast created with extra blue in sky to compensate the balance which creates not so real looking images to properly reflect the lighting design color temps and surroundings. Buildings illuminated by artificial light can also be problematic, depending on the lighting used in them. With digital cameras you can preview the image to check the color balance and if it doesn’t look right, just change the white balance setting you’re using to cloudy.
5) Capture the Angles: Look for areas with a raised height on the land around the buildings and landscapes you can shoot from. This could include from the top of a truck, ladder or even by using a drone. From up high you’ll be able to capture an improved view of the lighting design and fixtures with skylines slightly above, as well as focus on the single building or areas on the property more clearly. For something different, try to shoot the same location in daylight and in the evening, this will help to truly capture the beauty of your installations, the landscapes and the architecture and you’ll soon see how buildings have a very different feel at night when properly lit. Once your photos are captured in high quality, you’ll be able to apply some cropping of the illuminated buildings which will also make the image even more striking and reduce the black from surrounding areas that remained unlit, ensuring your photos always highlight the focus of your design for that location.
Photograph Your Lighting Design with Wide-Angle Lenses
To photograph a building or property in its entirety, you will need a lens with a wide-angle focal length range, whereas to capture details from a distance, you will need a lens with a telephoto focal length range. Hence, a single zoom lens that covers both the wide-angle and telephoto ranges is ideal. Generally, angles of view less than 35mm are referenced as “wide angle” and are used for capturing a wide area and often include a lens that’s 24 mm. This allows you to capture the entire building from a close distance in scenes where you are unable to shoot the building from further away, or when trying to capture the expansive view of a smaller area. Generally, angles of view larger than 85mm are referenced as “telephoto”, which allow you to make a distant fixture or detailed aspect of the architecture appear closer than they actually are when shooting in the telephoto range or using a 91 mm lens. This is useful when wanting to focus on the close up details of a fixture that is far away. When it comes to photographing architecture and real estate, wide angles are very important. Capturing the grandeur of a place and making it look inviting to showcase your lighting design work is important, and while you don’t need the most expensive cameras, your lenses are very important in these situations and should become an investment to grow your lighting design services business revenue.
Nighttime Considerations Tips to Show Off Your Best Work
Remembering the basics, when surrounded by darker locations at night the shutter speed is slowed down due to the lack of light, so camera shake occurs more easily and often creates unwanted blur. To counter that, increase the ISO speed of your camera so that you can shoot at a high shutter speed even in low light, and ensure you hold your camera steady. If you want to take higher quality images, it is necessary to use a tripod or other means of securing the camera. If using a tripod, camera shake can still occur as a result of the impact of pressing the shutter, so I would recommend setting the self-timer to 2 seconds when taking shots. Also, when capturing sources such as up lights, down lights and accent lights, your camera’s exposure meter could be fooled by the bright lights into thinking that the scene is much brighter than it really is surrounding your lighting design. It will therefore overcompensate for the brightness it does see, which may cause your photos to have a dark finish and not look as professionally lit. Although this can depend on the intensity of the light source and the distribution of the light within the frame of your shot, if you do feel that your photos tend to look too dark, try applying positive exposure compensation and go take that same shot again. By doing that, the beauty illuminated by each landscape light you installed should stand out more clearly in your shot.

9 Reasons Low Voltage Lights Are Beneficial
Most of the lower voltage lights are energy efficient and will be powered by electricity in the range of 12-volts. This kind of innovative lighting system can offer lots of benefits and are widely used not only around our home landscapes but can also be used outside an industrial and commercial buildings exterior as it can offer a high-quality brilliant luminance around the property, which is unique and cost-effective too.
Besides these low voltage lights being energy efficient and more environmentally friendly outdoors, you will find that LED landscape style lights will last much longer than any other type of conventional light bulbs such as incandescent or halogen equivalent lights.
As far as energy conservation benefits are concerned, 12-volt lights will always excel among many other lighting systems due to following 9 reasons:
1. Energy efficiency
All low voltage lights usually are highly energy efficient, particularly if they are compared with any incandescent bulbs. These types of outdoor led lights can also emit a higher quality amount of light output that any incandescent halogen bulb can by using only 20 percent of the energy that was used by an incandescent bulb.
2. Cost saving
In regard to the electricity bills and recurring operational costs to run exterior lights outside, you will get lots of additional savings benefits by using low voltage lights as these lights consume much less energy, last much longer and at the same time provide superior illumination both around the exterior landscapes and building architecture as compared to any other lighting option.
3. Minimum heat contribution
These 12V led lights will not get over heated or burn up like other incandescent or halogen bulb fixtures and will remain pretty cool outside ever after long hours of running since they produce a minimum amount of heat to the surroundings as well.
This, along with an outdoor light fixture body that is built to allow an improved thermal reduction through its design, you will notice it will prove to be really very useful to install these type of led low voltage lighting products to improve the energy efficiency and reduce heat around sensitive plants which also allows the lights to last longer and keep your lighting color temperatures consistent and looking great.
4. Longer life span
Most of the lower voltage lights, particularly IP68 and ETL rated LED lights, can last almost sixty times longer as compared to the older halogen or incandescent bulb lighting systems. Therefore, by using Garden Light LED lower voltage 12V lights you can also experience additional savings from replacing many bulbs too which enables your outdoor lighting system to become more sustainable and less of a burden.
5. Much safer option
These lights that are run at lower voltage power consumptions are much safer to install and use, as compared to other varieties of 120V lighting options. These lights mostly use 12-volts of electricity, along with one power transformer will be attached to your standard 110-volts outlet that is prevalent on most properties in the USA.
Therefore, when you install these 12-volt led lighting systems outdoors, these lights will not impose any risk of getting electrocuted when exposed to snow or rain.
6. Versatile
Lights using low voltage power connections will be relatively smaller as compared to all other types of 120-volt lights including incandescent bulbs. This implies that you will have the versatility of installing lighting systems to such spaces where any incandescent bulbs will not properly fit or be a good match for the exterior space.
Besides the size, small profile led lights are also very good in providing your outdoor living spaces with a soft illumination that is very pleasing to your eyes at night while requiring minimum maintenance and upkeep to continue looking good for many years ahead while staying out of view during the day or appearing bulky.
7. Worry-free security
You may easily install these types of outdoor LED lights using a lower voltage system at a house or business without worrying about increasing your electricity bills. Any burglars will easily be discouraged to enter a well-lit home or business when exterior lights are in place as compared to any house which is barely illuminated or dark.
8. Environment friendly
Due to an ever-increasing requirement for improving energy conservation efforts and the importance that this initiative will have on our future and well-being, it makes sense that by using these lower voltage lights and saving more energy that you can also take part in helping with the conservation goals needed to prevent using up our valuable energy resources or to continue rapidly depleting them.
9. Easy to install
It is much easier to install outdoor low voltage lights when you don’t have to worry about serious risk or injury from high voltage electricity currents. As you buy these low voltage LED lights you will also find many resources for quick installation tips too, in order to easily guide you through the simple process of installing the lights, connecting the wires with a power transformer and then readjusting the light output angles to make sure your exterior lighting design is truly beneficial.
Since there is no risk of getting electrical shock outdoors with these 12V lights as compared to high voltage lighting systems, you can install any of these energy efficient and sustainable low voltage lighting fixtures around your homes, landscapes and businesses safely while sleeping easy at night with an improved security and ambiance.
Understand Photometric Light Analysis Planning
When you are in the landscape lighting industry as a manufacturer, lighting designer, distributor, or architect specifier, you will often need to reference IES photometric plan files to understand the true output of light and lumen power for the fixtures you wish to install into your designs. For all of us in the outdoor lighting industry, this article is here to help us better understand how to read and analyze photometric lighting diagrams.
As stated by Wikipedia in the simplest terms as a reference to understanding optics; Photometry Is the science of the measurement of light. A photometric analysis report is really the fingerprint of how a luminaire light fixture delivers its light for that unique product design. In order to measure all of the light output angles and at what intensity (also called its candela or candle power), noting the analysis of a luminaire that delivers light, we use something called a Mirror Goniometer to help us identify these varied aspects of light being output in strength and distance relative to its patterns. This instrument takes light intensity (candela) and measures it at different angles. The distance from the lamp to the Goniometer has to be 25 feet or better to get a correct measure of the candela (intensity). For the IES photometric analysis to work properly, we start by measuring the candelas or candle power at 0 degrees (zero being below the lamp or the bottom). Then we move the goniometer 5 degrees and continue to move it again and again, another 5 degrees more each time all the way around the luminaire to properly read the light output.
HOW TO UNDERSTAND THE PHOTOMETRIC LIGHT OUTPUT MEASUREMENT PROCESS
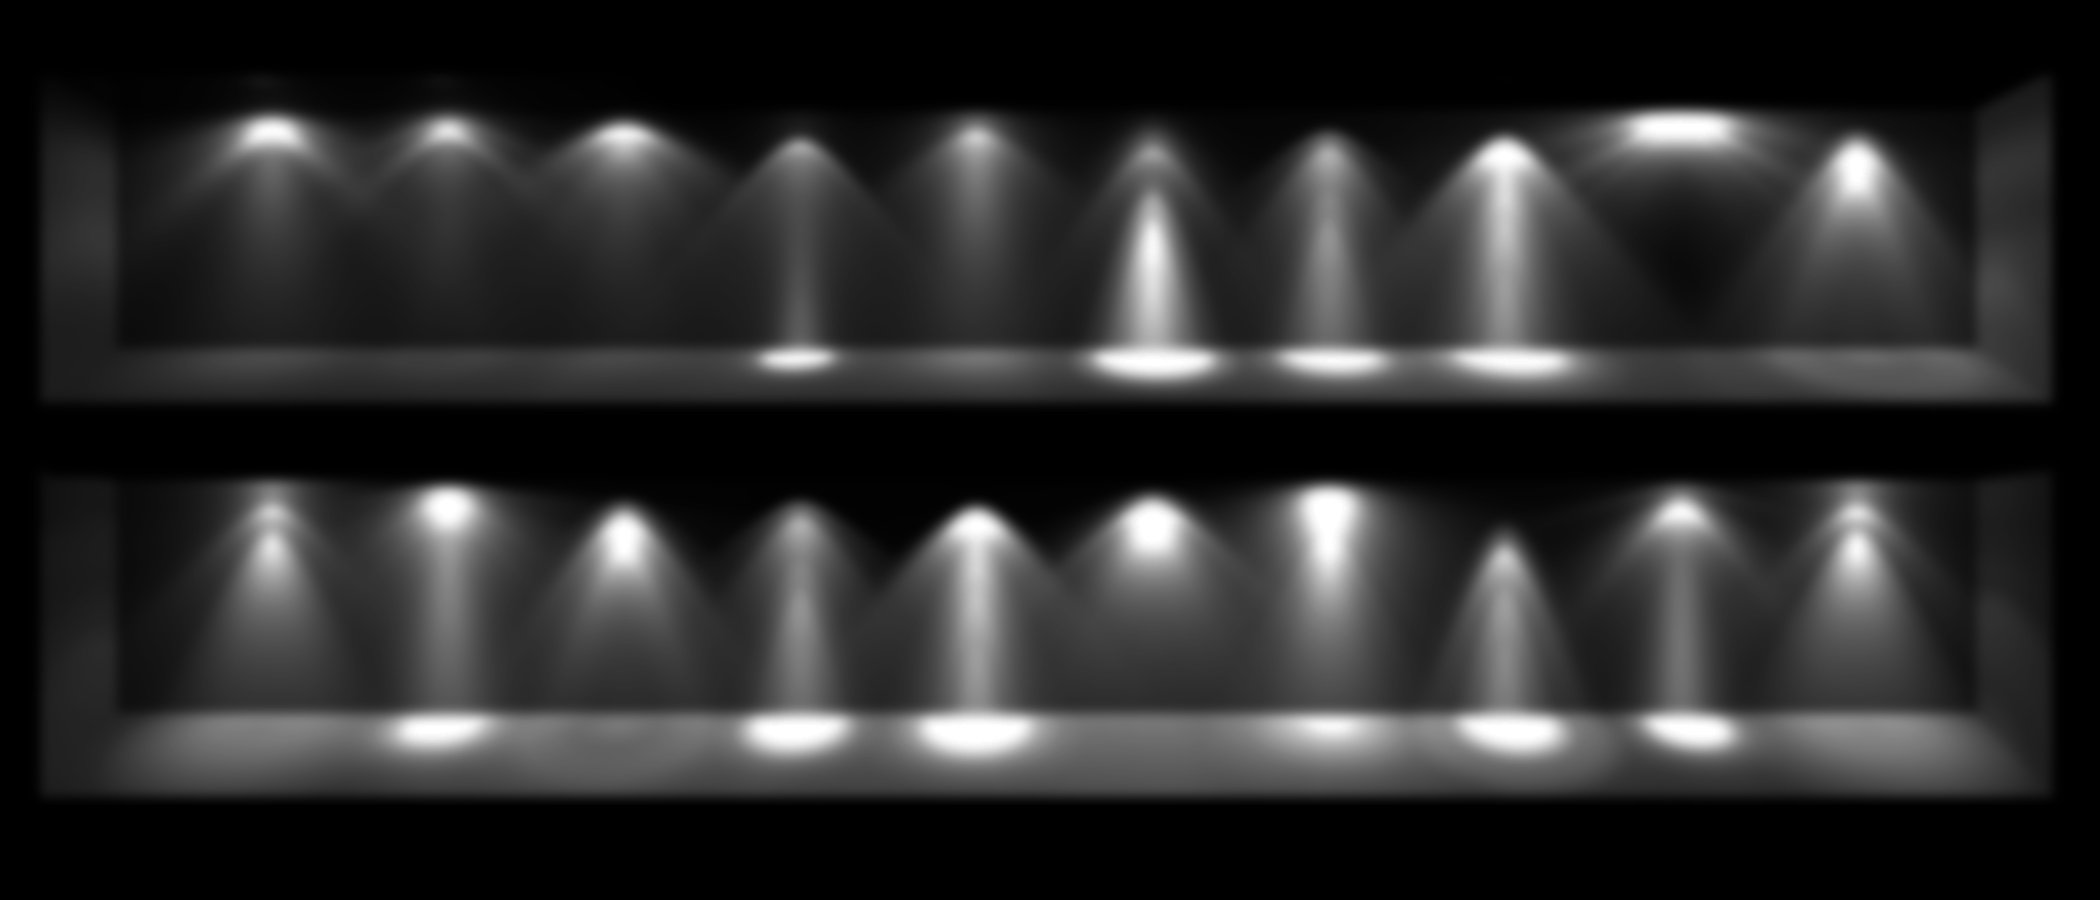
Once, having gone all the way around 360 degrees, we move the goniometer and start at a 45-degree angle from where we began and repeat the process. Depending on the landscape light fixture, we may do this at various different angles to properly capture the true lumen outputs. A candela chart, or candle power curve, is made from that information and utilized for creating these IES Photometric files we use in the lighting industry. At each different angle of light, we will see the different intensity of the luminaire which is often unique among lighting manufacturers. A light distribution model is then created, also called a candle power curve, which in turn provides lighting designers and architects with a visual representation of the light being diffused by a luminaire through its optics, shrouds, and shapes.
The farther away we get from the zero point of measure, the more intense the light output is. A candela distribution table is the candela curve but put in the tabular form.
The photometric light diagrams created from these findings tell you immediately if most of the flux (the lumens, the “flow of light”) goes upwards downwards or sideways.
The coefficient utilization table in photometry considers the percentage of light from the lamps that reach the work surface in a given space. The room cavity ratio is the ratio of walls to horizontal surfaces or floors to the work area. Walls absorb a lot of light. The more they absorb, the less light gets to the areas where the light is being cast upon. We also have reflectance values on these charts which consider the percentages of reflection from floors, walls, and ceilings. If the walls are of a dark wood that doesn’t reflect light well, that will mean that less light is being reflected on to our work surface.
")
Understanding how all of this light output works for each product, allows the lighting designer to accurately plan the height at which to place a lamp and the distance between the lamps to properly illuminate the outdoor spaces to fill that space with evenly distributed light. With all this information, photometric planning and analysis will allow you (or software) to easily select the right amount of luminaires required for the most beneficial lighting design project plan by factoring in the appropriate wattage power and lumen output levels to create that optimal lighting coverage using the specifications which illustrate the degrees of light angles that each light will display on the architects blueprints for the property. These methods for determining the best landscape lighting designs and installation plans, allow the professionals and large construction project purchasing managers to properly control and understand which lights are best to install into a given area on the property blueprint from the architects, based on the light distribution curves and lumens output data.
INDUSTRY PHOTOMETRIC PLAN LIGHTING IES DIAGRAM CHART TERMS
Lumens: flux, measured in lumens (lm), is the total amount of light produced by a source without regard to direction. The luminous flux is provided by lamp manufacturers and common lumen values are included in the lamp matrix.
Candela: Luminous intensity also referred to as Brightness, measured in candela (cd), is the amount of light produced in a specific direction. Graphically, this information is compiled into polar formatted charts that indicate the intensity of light at each angle away from 0 ̊ lamp axis (nadir). The numeric information is also available in tabular form.
Footcandles: Illuminance, measured in footcandles (fc), is the measure of the quantity of light that arrives on a surface. Three factors that affect illuminance are the intensity of the luminaire in the direction of the surface, the distance from the luminaire to the surface, and the angle of incidence of the arriving light. Although illuminance cannot be detected by our eyes, it is a common criterion used in specifying designs.
Please note: Footcandles are the most common unit of measure used by lighting professionals to calculate light levels in businesses and outdoor spaces. A footcandle is defined as the illuminance on a one square foot surface from a uniform source of light. The Illuminating Engineering Society (IES) recommends the following lighting standards and footcandle levels to ensure adequate illumination and safety for occupants.
Candelas/meter: Luminance measured in candelas/meter is the quantity of light that leaves a surface. It is what the eye perceives. Luminance will reveal more about the quality and comfort of a design than illuminance alone.
Center Beam Candle Power (CBCP): Center beam candlepower is the luminous intensity at the center of a beam, expressed in candelas (cd).
Cone of Light: Useful tools for rapid lighting comparisons and calculations, cones of light calculate initial footcandle levels for a single unit based upon point calculation techniques. Beam diameters are rounded to the nearest half-foot.
")
Downlight: These cones of light provide single-unit performance with no inter-reflections from surfaces. Data listed is for mounting height, footcandle values at nadir, and resulting beam diameter.
Accent Lighting: Patterns of light from adjustable accent luminaires are dependent upon the lamp type, wattage, lamp tilt and location of the illuminated plane. Single-unit performance data is provided for horizontal and vertical planes, with the lamp tilted at either 0 ̊, 30 ̊, or 45 ̊ aiming.
Beam Light Aiming: Beam light aiming diagrams allow a designer to easily select the proper distance from a wall to locate a luminaire and get the center beam of the lamp where desired. For lighting art objects on a wall, the 30 ̊ aiming is preferred. At this angle, 1/3 of the beam’s length will be above the CB point, and 2/3 will be below it. Thus, if a painting is three feet tall, plan for the CB to be aimed 1 foot below the top of the painting. For increased modeling of three-dimensional objects, two lights are typically used, a key light and fill light. Both are aimed at least 30 ̊ elevation and are located 45 ̊ off axis.
Wall Wash Lighting Data: Asymmetric wall wash distributions are provided with two types of performance charts. A single-unit performance chart plots the illuminance levels at one-foot increments along and down a wall. Multiple-unit performance charts report the performance of the middle units computed from a four-unit layout. Illuminance values are plotted centerline of a unit and centered between units.1. Illuminance values are cosine-corrected initial values.2. No room surface inter-reflections contribute to illuminance values.3. Changing unit spacing will affect the illumination level.
INDUSTRY PHOTOMETRIC PLAN LIGHTING IES DIAGRAM CHART TERMS
Understanding how light is properly measured and analyzed is always important in the outdoor landscape lighting industry. When using lights for large projects, we must also plan far ahead and understand that we are properly designing our lighting plans to help us know far ahead of time, what lights we will install where, and how many we will install at certain distances to get the proper light coverage. This is why at Garden Light LED our hats go off to the lighting labs, IES engineers and the Intertek standards for low voltage lighting fixtures that aim to provide our industry with true readings for high-quality light measurements and giving us data that professionals can utilize to create more efficient lighting designs while making smarter buying decisions.
If you are shopping for outdoor landscape lights, we always recommend watching out for many of the other resellers pretending to be manufacturers stating high lumen outputs at low costs, because in our facility photometric tests, these other light fixtures from many other low voltage landscape lighting brands in the USA and abroad, are falling very short of their reported specifications and power demands light output claims with their cheap imported products.
When you’re looking for the best landscape lights out there, we welcome you to contact us and we’ll be happy to put one of our professional-grade led lights in your hands to conduct a real-world comparison!
Driveway Lighting Design Ideas for Your Home and Business
Learn How to Create a Safer and More Welcoming Driveway Entrance
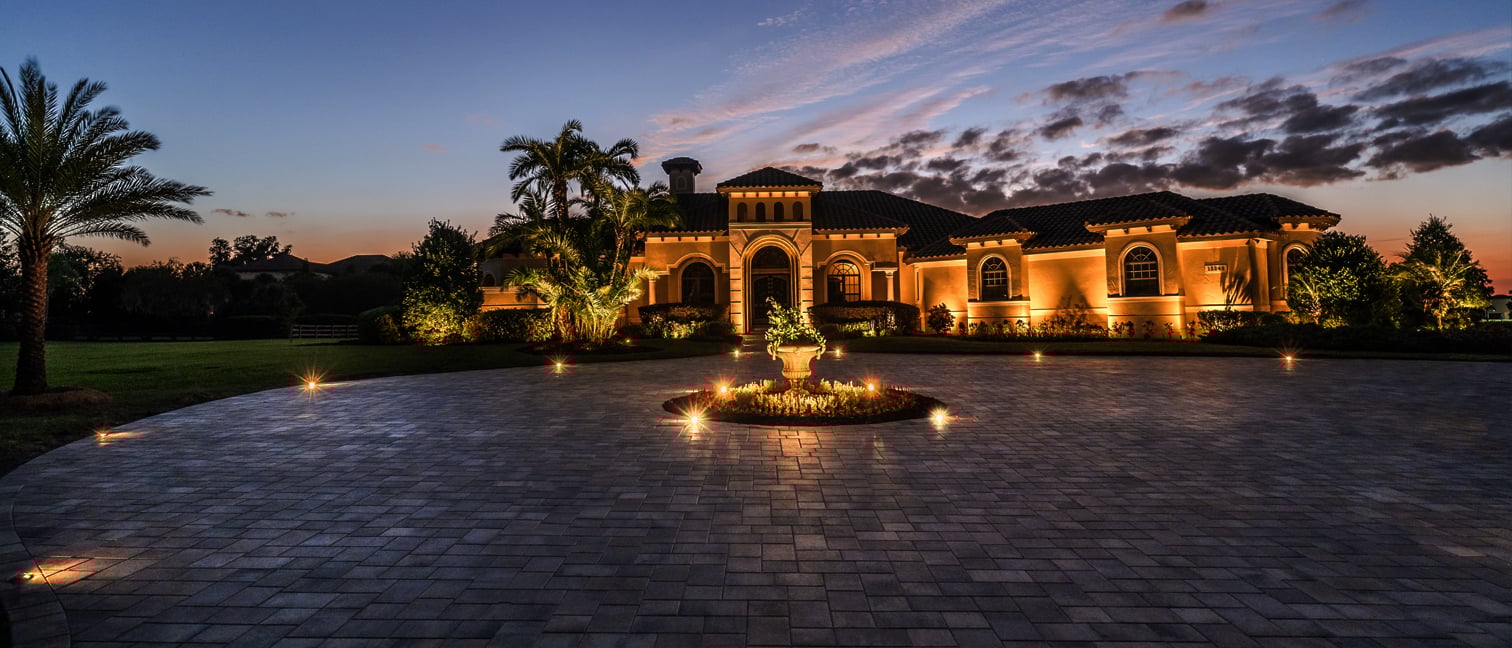
Driveway entrance lighting is a very important aspect when looking to create a safe and welcoming entrance that you and your guests will enjoy every night at your home or business. Sometimes, builders and lighting designers may also make the mistake by over-lighting a driveway entrance by installing too many light fixtures. This driveway lighting design mistake, is often a result that occurs by simply focusing on lighting the entry drive-up areas way to brightly from the wrong angles or from overhead fixtures that can become blinding or create glares to the drivers as they pull up, creating a negative effect on the welcoming ambiance that most residents, guests and lighting business owners desire.
As a rule of thumb, when you’re looking for the best ideas to create a welcoming driveway lighting design that’s truly safe and alluring to drive into every night, ensure your driveway lighting project ideas include the use of low profile lighting fixtures that can handle being driven over by heavy vehicles while being durable and attractive enough to avoid unwanted maintenance costs or covers that may restrict light output. By creating a plan to properly light your driveway, your outdoor lighting design will create the desired effect that allows you and your guests to feel like they are always arriving in style.
")
Driveway Lighting Design Considerations
When you start to plan and search for the best driveway lights that fit the criteria for adding appeal and safety to your next lighting job, look for high quality and elegantly designed landscape lighting products that are safe for outdoor use and can handle all weather conditions. Driveway entry lights should be used to guide drivers safely along the path in a welcoming manner, not become blinding obstacles that offer no warmth as you and guests arrive. For that reason, low voltage landscape lighting products of high-quality are usually the most ideal fixtures for these types of lighting projects.
For the best driveway lighting design that’s energy efficient, use LED landscape lighting fixtures strategically along the paths of entry and parking that have a low-profile. Your driveway lights should also be placed properly on the driveway per distance desired and wherever there are close obstacles that will change their direction of arrival around curves and turns. Driveway obstacles that may interfere with seeing properly as pulling up, may include trees, hills, walls, fences, bushes or landscape gardens. For this reason and to avoid line of sight issues when driving up, install low profile surface mounted or mini recessed led lights that are ideal for installation on driveway pavers, bricks, concrete or asphalt entryways where vehicles drive most often when arriving and leaving a home or business.
With the many different LED fixture types and outdoor lighting effects available for best lighting the driveways, it’s always better to install a quality light that can create that desirable effect improving the ambiance. If your idea is to light both sides of the driveway and then ensure the outside landscape barriers become well-lit also for that added appeal, try these ideas to properly light your driveway.
- Install double-sided lights that output in different directions with one fixture to best illuminate.
- Buy low profile lights that avoid added dangers of safety for tripping or blinding guests as arrive.
- Look for driveway lights that can handle all weather conditions during all seasons to remain lit.
- Ensure the lights are durable enough for the weight of large vehicles and will not get damaged.
- Illuminate the parking and driveway with welcoming colors to add unique charm and appeal.
- Introduce lights into the design plan at consistent distances and on corners to assure coverage.
If you have a long curvy driveway consider lining the edges with path lights also for an added effect. These landscape path lights will help visiting drivers see the route that is ahead of them while also lighting up the amazing landscape gardens that line the side of the entryways or parking areas to truly add an extra welcoming appeal.
Illuminating the Driveway Landscapes
Additionally, you may desire to highlight trees with spotlights and walls with wall washer lighting fixtures if they sit nearby along the driveways. In general, when it comes to lighting ideas, installing a few extra up-lights around trees and shrubs along the driveways will further complement the design while adding that perfect amount of light to further accentuate the best low profile driveway lighting designs. In the end, creating a professional landscape lighting design plan that factors in quality considerations to add real value into your lighting illuminations, will truly allow your driveway lighting ideas to stand out by always shining bright and becoming much more welcoming than the rest.
If you’d like to discover more ideas to elevate your next landscape lighting project, contact Garden Light LED to discuss your ideas and plans to create the best outdoor lighting design the town has ever driven up through or scene.